Mastering 3D Puff Embroidery: Techniques and Applications
3D puff embroidery has become one of the most eye-catching and popular embroidery techniques today. It adds a bold, raised effect to designs, making logos, lettering, and simple shapes literally pop off the fabric. Whether it’s on caps, jackets, or sportswear, 3D puff embroidery creates a striking visual impact that flat embroidery simply can’t match.
In this blog, we’ll dive deep into the world of 3D puff embroidery – what it is, how it works, the best techniques to master it, and the kinds of designs that work best. We’ll also explore the critical role of digitizing experts and vector art in creating flawless 3D puff embroidery, and how the digitizing process itself adapts to this unique style. Finally, we’ll suggest some internal linking opportunities for nkemb.com to enhance user experience and SEO.
What is 3D Puff Embroidery?
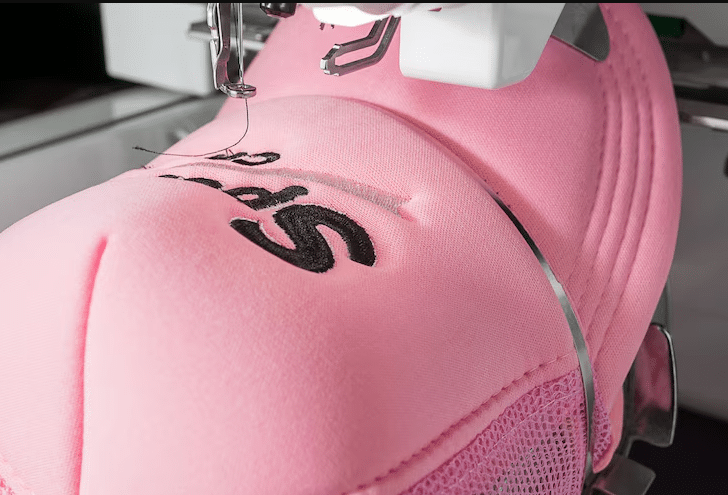
3D puff embroidery is a technique where a special foam is placed under the embroidery stitches to create a raised, three-dimensional effect. Unlike traditional embroidery, where stitches lie flat on the fabric, 3D puff adds volume and depth by stitching over the foam, causing the design to “pop” off the surface.
This method is especially popular for caps and jackets because it makes logos and lettering bold and eye-catching. The foam acts as a cushion, lifting the thread above the fabric and giving designs a tactile, sculpted look.
How Does 3D Puff Embroidery Work?
The process begins by placing a piece of foam on the fabric where the embroidery will go. The embroidery machine then stitches over the foam with dense satin stitches, which hold the foam in place and shape the design.
Key points in the process include:
- Design Preparation: The artwork is digitized specifically for 3D puff embroidery, with adjustments made to stitch density and underlay to accommodate the foam.
- Foam Placement: After the first outline stitches, the foam is carefully placed on the fabric, and the machine continues stitching to secure it.
- Finishing: Excess foam around the design is trimmed away, leaving a raised, clean-edged embroidery.
Because of the foam’s thickness, 3D puff embroidery works best with bold, simple designs rather than intricate details, which can get lost or look messy when raised.
Best Designs for 3D Puff Embroidery
Not every design is suited for 3D puff embroidery. The technique shines with:
- Bold Block Lettering: Thick, simple fonts like collegiate or sports-style letters look fantastic with a puffed effect.
- Simple Logos with Wide Outlines: Logos that have clear, broad shapes translate well into 3D puff.
- Geometric Shapes: Stars, shields, circles, and other bold shapes maintain their structure and dimension.
- Minimalist Icons: Small but bold symbols such as arrows or crowns can be effective.
- Sports and Athletic Designs: Team logos, jersey numbers, and sports-related graphics stand out with this technique.
Intricate or highly detailed designs don’t work well because the foam can obscure fine details, making the embroidery look cluttered.
The Role of Digitizing in 3D Puff Embroidery
Digitizing is the process of converting artwork into a stitch file that an embroidery machine can read. For 3D puff embroidery, digitizing is more complex than for flat embroidery because the digitizer must account for the foam and the raised effect.
A skilled digitizing expert plays a crucial role in:
- Adjusting Stitch Density: The stitches must be dense enough to hold the foam securely but not so dense that they cause puckering or thread breaks.
- Adding Underlay Stitches: Underlay provides a foundation that stabilizes the foam and fabric.
- Planning Stitch Direction: Proper stitch angles help maintain the design’s shape and prevent distortion.
- Placing Stop Codes: These pauses in the embroidery process allow the operator to place the foam accurately before stitching continues.
Digitizing experts analyze the design carefully to ensure that the raised elements enhance the overall look without compromising detail or durability. Their expertise ensures that the embroidery machine produces a clean, professional finish.
Why Vector Art is Essential for 3D Puff Embroidery
Vector art is the backbone of professional embroidery digitizing, especially for 3D puff designs. Unlike raster images, vector files are made of paths and curves that can be scaled without losing quality. This precision is vital for 3D puff embroidery because:
- Accuracy: Vector art provides clean, sharp outlines that digitizers can follow precisely, ensuring the foam is covered evenly.
- Scalability: Designs can be resized for different garment sizes or embroidery areas without distortion.
- Flexibility: Vector files allow easy adjustments to design elements, such as thickness or spacing, which is critical for adapting artwork to the puff embroidery technique.
Using vector art simplifies the digitizing process and helps create embroidery that looks sharp and professional, with smooth edges and consistent stitch coverage.
Techniques for Mastering 3D Puff Embroidery
Mastering 3D puff embroidery involves understanding both the digitizing process and the physical embroidery steps. Here are some key techniques:
1. Proper Foam Selection and Placement
Choosing the right foam thickness is essential. Too thick, and the embroidery may look bulky or cause thread breaks; too thin, and the puff effect is lost. Foam is usually cut to the shape of the design and placed carefully after the initial outline stitches.
2. Stitch Density and Underlay Optimization
Digitizing experts set stitch density higher than usual to securely hold the foam but balance it to avoid fabric puckering. Underlay stitches stabilize the fabric and foam, preventing shifting during embroidery.
3. Use of Stop Codes in Digitizing
Stop codes pause the machine after the outline is stitched, signaling the operator to place the foam. This precision step ensures the foam sits exactly where needed for a perfect puff effect.
4. Stitch Direction and Pull Compensation
Proper stitch direction helps the design maintain its shape and reduces distortion. Pull compensation adjusts stitch lengths to counteract fabric pull, keeping the embroidery crisp.
5. Foam Trimming and Finishing
After stitching, excess foam is trimmed away carefully to reveal a clean, raised design. Some operators use heat tools to melt small foam remnants for a smooth finish.
Applications of 3D Puff Embroidery
3D puff embroidery is widely used in:
- Caps and Hats: The most common application, where the raised effect creates bold logos and lettering.
- Sports Apparel: Team names, numbers, and logos on jerseys and jackets.
- Corporate Branding: Eye-catching logos on uniforms and promotional items.
- Fashion: Adding texture and dimension to casual wear and accessories.
- Merchandise: Customized products like bags, patches, and more.
Its versatility and visual impact make 3D puff embroidery a favorite for brands looking to make a statement.